 Editing existing
e-mail accounts:
Editing existing
e-mail accounts:
Editing existing
e-mail accounts:
This tutorial covers how to edit existing e-mail accounts in Outlook 2000. Just follow the steps below:
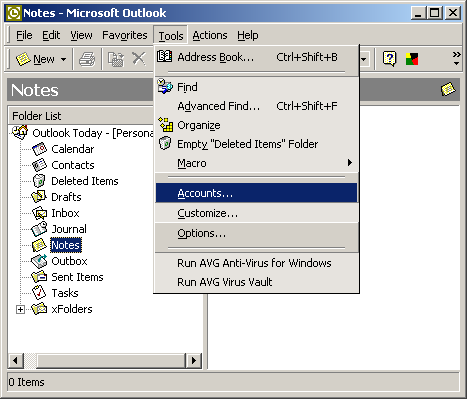
On the Toolbar, click Tools and select Accounts from the menu.
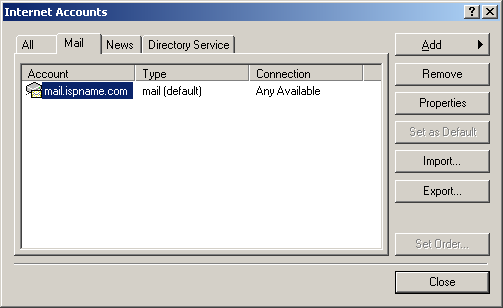
The Internet Accounts window appears.
Select the Mail tab.
Highlight the desired account and click Properties.
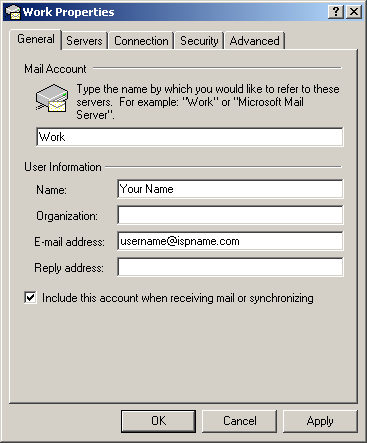
Select the General tab.
Mail Account = You can give the name of the mail account anything you'd like. In this example, I gave the account the name 'Work'.
User Information:
Name =
Enter your name.
E-mail address = Enter your e-mail address.
Important: Ensure Include this account when receiving mail or synchronizing is checked.
Select the Servers tab.
Server Information:
Incoming mail (POP3) =
The Incoming (POP3) mail server usually follows this format: mail.ispname.com
(or .net). Replace the "ispname.com
(or .net)" with your ISP's name.
Outgoing mail (SMTP) =
The Outgoing (SMTP) mail server usually follows this format: mail.ispname.com
(or
.net). Replace the "ispname.com
(or .net)" with your ISP's name.
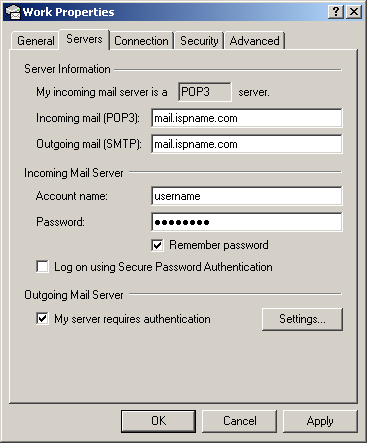
Incoming Mail Server:
Account name
=
Enter your e-mail username (everything before the @).
Password = Enter the password to your e-mail account.
Important: Passwords are case-sensitive. Ensure your Caps Lock is disabled.
Select Remember password.
Important: Do NOT select Log on using 'Secure Password Authentication'.
SMTP authentication is required to send e-mail. Without this enabled, you cannot send e-mail. SMTP authentication helps deter would-be spammers from spamming you.
Outgoing Mail Server:
Towards the bottom, left corner there is a box: My server requires authentication. Check it.
To the right, click the Settings button.
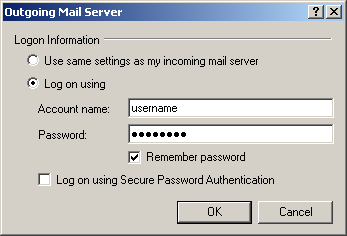
The following window appears:
Select Log on using.
Account name
=
Enter your e-mail username (everything before the @).
Password = Enter the password to your e-mail account.
Important: Passwords are case-sensitive. Ensure your Caps Lock is disabled.
Select Remember password.
Important: Do NOT select Log on using 'Secure Password Authentication'.
Select the Connection tab:
Outlook 2000 can connect automatically to the Internet through your dial-up connection. To enable this, do the following:
1. Check the box
Connect using my phone line.
2. Select your dial up connection from the drop-down menu.
You can also click the Properties button to change the DUN settings or the Add button to create a new Dial-up Networking connection.

Select the Advanced tab.
Server Timeouts:
You can maximize the this setting to five minutes for improved performance
handling larger volumes of e-mail and possibly larger attachments.
Leave a copy of Message
on Server:
We strongly discourage this option. Outlook 2000 will eventually start
reporting that there are "no new messages" even though there are new messages.
If you do use this option, then you should also check one of the boxes below:
Remove from server when deleted from 'Deleted Items' or
Remove from server after 5 day(s).
Note: Do NOT put a checkmark for the SSL secure connection options unless you are running a virtual domain that is specifically setup with a secure SSL mail server. (This is highly unusual with standard Internet connections.)
Click the OK button to save the configuration and to close the window.

Links: Return to top